The deck will of course be concave or 'spooned' fore and aft, and nearly flat athwartships. This gives the best possible control for the rider.
Heavily domed decks and tapered profiles ( especially when combined with extreme thin downrails which have the rail apex far below the rider's feet ) raise the centre of gravity and centre of effort causing instability and lack of control, they also reduce the leverage which the rider can apply via the feet, as well as killing beneficial flex. That's why we don't do them. I think of thick domed boards as Fat Guys in Tutus (FGT).
Most people assume that a very long board will necessarily also be thick and extremely buoyant. My preference is however to use the minimum thickness which gives adequate buoyancy and strength. In this case the maximum thickness is 2.5 inches, and the volume is approximately 168 litres . . . a modest volume for a 19 foot 27 inch wide board.
Thickness should be spread thinly and evenly, not lumped up in the middle of the board, at least in this bricklayer's opinion, which is in harmony with the laws of physics and his personal experience as much as possible.
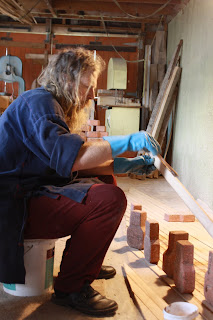
A few questions: Hi Roy, Awesome project. I was just thinking about all the glue and sawdust you'll be using. Huge effort. I have some questions on your method if you don't mind. How do you apply clamping pressure to the planks? It seems you have the bricks to keep them flat and even, but I can't see how you put pressure on them to keep them together. Doesn't the epoxy need the pressure to maintain strength as it sets? How do you get the rocker into the board? Again it seems from the photos the strips are being laid flat. If you bend them afterwards there is the inherent stress that will try to make it always flatten out. If they are laid bent that stress will be greatly reduced. (I think anyway). Thanks for sharing what you do (I wouldn't mind giving your method a go one day). A..... | ||
Epoxy doesn't need pressure when it is setting, so very little clamping pressure is needed for the planking. Having said that I'm happy to let the glue lines be of varying widths, as I like the look it gives more than ultra tight invisible joints, it's also stronger that way. I'm able to edge set the planks sufficiently with just with a couple of dozen bricks, provided that the planks are reasonably straight. With problem planks I scribe and fit them.
As far as bending goes it's a breeze, a panel like the one I'm making is so flexible that it can just about be bent in a complete circle. The construction method is basically bulletproof and doesn't have the nose plank and spine cracking problems with the fishbone method sometimes has.
It's also possible to bend concave or roll into the board either by having lightweight battens on the rocker jig which bend under sufficient weight or by cutting the required curves into the jig battens. If the bottom is concave the deck will be sightly domed, but typically no more than a quarter inch.
There's no more built in stress in the planking if the planking is glued up prior to bending. For bending on to the rocker table I just use bricks and a couple of clamps in the nose area if the board has a tighter rocker curve there, which most of them do. It's good to have the deck and bottom in slight tension and compression in my opinion as it gives a better resonance, like a drum.
The parallel profile system is deceptively simple, I say deceptively because for the best results it requires careful balancing of the design parameters ( particularly of volume and thickness ) due to the fact that these are linked to each other in a way which doesn't happen with conventional boards. With conventional boards 'ad hoc' changes can be made, whereas with the parallel profile every change affects the entire board, which is why I feel that it's the haiku of surfboard design
Thanks for your questions


